Wednesday, January 8, 2014

meat and potatoes- variety with basics

So in the last five months, we've eaten a lot. If you can imagine. A jump roper and a pregnant lady. We make quite the hungry team.
I've been pretty thrilled with the energy I've had throughout my pregnancy, so fortunately I've still been able to enjoy cooking. Despite what I haven't shown on this blog. I really like to try new things, recipes others give me or random things I find online by searching for a list of the ingredients I want to use, especially when I'm not feeling terribly creative and don't have any ideas on how to mix things myself. But I also have some basic go-to ideas, formulas if you will for a quick, no-thought meal that still tastes like there was a lot of thought put into it. Marinades are great that way :)

The idea of marinating is, of course, that you let it marinate. If you're trying to think of dinner plans at 4:30 to eat a little after 5, overnight marinating is out of the question. But letting your meat bake in a marinating sauce, or really most kinds of dressings, gives your meat great flavor, even if it's not as rich a flavor as you would get from actually marinating. I also using this baking marinate method because we find random marinated and salad dressings on sale for a dollar or so, usually less than that, so we sample them. Why not? Once or twice we've found that they're a little strong for marinating (actual soaking it overnight), and the meat isn't very good afterwards. Baking instead of marinating makes the flavor not as strong- if you're experimenting, it's a safer method of not being disappointed.

So there's your meat. Thaw something that maybe you don't know what to do with (pictured: top sirloin  steak- we found in a small package that was barely enough to feed us, but it was perfect with a side) and cover it in a salad dressing (pictured: sun-dried tomato salad dressing). Let it bake at somewhere between 350-400 for about 30 minutes, depending on the meat of course, but across the board, this is pretty safe. Check it periodically, of course; some meats you want more done, some a little more tender.


Not the greatest picture in the world, but I always forget to take a picture until after we're eating. Oh well.

Then I have an assortment of four kinds of potatoes that I choose to go with the meat- mashed, wedged, baked, or twice-baked(pictured). None of them take quite as long as the meat does, so dinner can be ready all at the same time, but you can prep the potatoes while the meat is cooking. 

Mashed potatoes Everyone has their own recipe. I like to chop and boil potatoes, drain them, beat them with a little bit of butter and a little more milk. 

Wedged potatoes My sister taught me this one, and I use this style of potatoes all the time. Cut a potato into wedges (if it's a large potato, using two is too many for me and Jeremy, so maybe 3/4 of a large potato is a generous serving size for an adult), arrange them around a microwave safe plate. Sprinkle with whatever seasonings you like (I use a garlic pepper blend), and then put a generous tablespoon or two of butter in the middle of the plate. Cover with saran wrap. Put in the microwave for 9 minutes. Delicious.

Baked potatoes Stab each potato generously with a fork. Toss the potatoes into the oven around your meat tray (they'll  need roughly 15 minutes more than the meat will). You can also make them in the microwave- stab each potato generously with a fork, then put them in the microwave for about 12 minutes, flipping them over about halfway through (the time varies with the size of your potatoes and the power setting on your microwave, so you may need a little more or a little less time). 

Twice-baked potatoes There are lots of great recipes for these. I use a pretty basic and somewhat adapted recipe- Bake the potatoes (I usually do this part in the microwave), let them cool a little bit before slicing them open and scooping out the insides, leaving a potato canoe. Mix the potatoes with a tablespoon or two of butter, a little bit more milk (1/4-1/2 cup), bacon bits, and cheddar cheese. Spoon the spread back into each of the potato canoes, and stick them back in the over for another 15-20 minutes. 


Step 1: Meat and marinade. Bake for half an hour.
Step 2: Pick a potato style. Throw together while the meat's cooking.
Enjoy!


Tuesday, August 27, 2013

Microwave Mug Omelettes

I have a ridiculously hard time getting out of bed lately. So when I have to be up early for something, I usually want a really great breakfast. But I also don't want to get up any earlier than I have to to make aforementioned great breakfast.

So this morning, I found this:


Of course, I found this 15 minutes after my alarm went off, while I was laying in bed justifying that I was at least not falling back asleep. I was searching on my phone for a recipe, just something worth eating, while actually battling my desire to look presentable when I went to work and my desire to sleep for another 45 minutes. 

  • 1 egg
  • 2 egg whites
  • 2 tbsp diced ham
  • 1 tbsp diced bell peppers
  • 2 tbsp shredded cheese

Thoroughly coat the inside of a mug with cooking spray. Mix all of the ingredients in the mug, microwave for 1 minute on high. Stir, then microwave for another 1 1/2 minutes.

I found this recipe and got a little bit excited about it. So vanity won.

We didn't have bell peppers or ham, so I just made these with eggs and cheese. I also threw some bacon on a cookie sheet in the oven and bread in the toaster, in between blow drying my hair and putting on my makeup. Jeremy came in while I was finishing up all of the food and asked what he could do, so I told him to make hot chocolate.

"Didn't I just watch you make hot chocolate?"

"No, you just watched me make omelettes."

"...in cups?"

"Yes."

Breakfast was a success. Arguably, not as time efficient as I was expecting (or I just shouldn't have laid in bed for so long) because we were still a few minutes late getting out the door, but we were all well-fed... so I didn't complain.


Monday, July 22, 2013

bacalhau com natas.

One of the things I absolutely loved about Portugal was the food. My goodness. With as much as I felt like I ate all the time because people liked to feed us so much, I'm surprised I didn't come home looking like a balloon. I asked everyone for recipes, but there was one recipe that everyone told me was too hard to make. Bacalhau com natas, literally, "codfish with cream," is a very, very traditional Portuguese dish. You can find it at every restaurant, even some fast food places, it's just the dish of Portugal. And it's so good. The first time I had it I loved it, and I really wanted it whenever I had the opportunity. When I spent a few days in the mission home after my family's car accident, the chef asked me what my favorite Portuguese meal was, and I told her this was it. And she made it for me. So there you have the sentimental factor, added to mission nostalgia, that the only thing I remember eating in the midst of disaster was bacalhau com natas (and chocolate milk, but that's just... a given). 

Just trust me. It's good. 

So when we decided to have a "mission night" for dinner, where all of Jeremy's siblings and I got together and brought a dish from each mission, depending on who had served and where they had served, to help my sister-in-law get ready for her mission, I just wanted to try to make that recipe that everyone told me was too hard. I found a million recipes that only varied slightly, but I read every one and none of them seemed all that difficult to make. It does take a little bit of time, but otherwise, nothing too crazy.

Well, okay, I lied just a little bit. The first real step is to buy salted cod and soak it for 24 hours and change the water a few times. So maybe people telling me it was hard just meant that it took some time. I used cod fillets that had been breaded and seasoned and just needed to be parboiled. It took about 24 hours off the time estimate...


Ingredients:

  • 4 fillets salt cod (about 1 lb.)
  • 3 lbs. of potatoes, peeled and cubed
  • 1 onion
  • 5 cloves of garlic
  • 5 tbsp of oil
  • 1 bay leaf
  • 1 pint heavy whipping cream
  • 1 c. milk
  • 1/2 tsp of nutmeg
  • 2 tbsp unsalted butter
  • 2 tbsp corn starch
  • 1/2 tsp salt
  • pepper to taste
  • fresh parsley
So in case you do choose to get fillets that haven't been prepared with anything, you should soak them for 24 hours, changing the water twice. Keep the cod in the fridge. After the 24 hours, parboil the cod for about 5 minutes in water. Flake the fillets and remove the bones and skin if the cod requires it (you can buy skinless cod). Set aside.

Peel the potatoes, wash, cut in small cubes, and fry with 3 tbsp of olive oil, just until they look cooked. Don't over fry them. Set aside.

Slice the onion in thin rings, mince the garlic, add a bay leaf, and fry all with 2 tbsp of olive oil until soft and translucent (about 5-8 minutes). Add the cod, saute a little bit and then add the potatoes, mixing it all together. Remove from heat and set aside. Preheat the oven to 350F.

Sauce:

In a medium skillet, melt 2 tbsp of butter and slowly add the corn starch, mixing well. Add the milk and heavy whipping cream and mix until well combined. Add the nutmeg, salt, and pepper and cook over low heat for about 10 minutes or until the sauce has a rich, creamy texture.

Add 2/3 of the sauce to the cod, potatoes, and onion mix and pour into a large baking dish (a 9X13 is about the smallest I would go, it makes a lot!). Cover this mixture with the rest of the sauce and put in the preheated oven for 20 minutes. After the 20 minutes, turn on the broiler and gratin for another 5-8 minutes, keeping an eye on it so it doesn't burn (you want just a golden crust on top). 

Remove from the oven and allow to stand for 5 minutes. Serve with chopped fresh parsley.


*Note: The first time I made this, I cheated on the amount of potatoes I used. I was in kind of a hurry, and I didn't have 3 lbs. The result was that, even baked, the casserole was a little bit runny. It still tastes really good, but this isn't quite the traditional texture. You might not want to cheat :) all I'm saying. 


Thursday, June 13, 2013

why I love clearance shopping.

We were headed up to Logan last week, and we were trying to get out the door as fast as possible.
This never happens. We try, we try to leave by 7PM so we can get there before 9PM, but we always have other things we decided we need to do and we never get there before 11PM. But I had been planning for it all day. I knew what dinner was going to be before I got to work, so I hoped that I would get home and have dinner ready and then we could eat and then leave quickly.

Potato wedges baked in garlic, and chicken marinated in dijon dressing. It was going to be half an hour, probably before Jeremy even got home from work, and we could eat as soon as he walked in the door.

The idea morphed by the time I got home. I don't know why making potatoes seemed like more effort than I was willing to go to, but it was. So I decided to put them together, with a different dressing.
Three ingredients:

1. Red potatoes (given to us by my mother-in-law the week before)
2. Chicken drumsticks (we found an incredi-sale on meat at Smith's one day. 5 drumsticks were $1.75)
3. Sweet vidalia onion dressing (one16 oz. bottle- part of a different clearance rack at a different Smith's. $0.49 a bottle)

I did cut the potatoes in half, but otherwise I was not up for effort. I threw it all into a glass baking pan. I stirred everything around to make sure it was covered in dressing, and put it in the oven at 350 for about 40 minutes.

So I cheated on the picture a little bit. I didn't serve it with broccoli, but the picture I remembered to take after we'd eaten most of it wasn't as appetizing as I thought. But it looked like this. Minus broccoli. 

It was absolutely delicious. And the whole thing cost us $2.24.

And that's why I love clearance shopping.

Tuesday, April 30, 2013

on babies and busy schedules- new spin on lasagna.

Jeremy and I have a couple of good friends that just had their first baby, and we were (and still are!) so excited for them. It was especially fun to tease the mom, Kana, about how enormously huge she was not even 5 months into her pregnancy. We were also excited about being able to bring them dinner one night the first week that Kana and her baby came home from the hospital.

Only we weren't actually home the week they came home from the hospital.


Fortunately, there were lots of other great people around to help them get back into the normal routine of things and brought them dinner for a week or two. But Jeremy and I felt terrible for not being around to offer any assistance, nutritional, social, or otherwise, so we decided we'd make it up to them. By texting them in the middle of the week.

"It's already in the works, so don't make anything for dinner tonight."

Both Kana and Ed laughed at us. But as Ed was also in the middle of his last finals, Kana was happy to postpone whatever they planned to eat that night (and yelled at Ed as soon as he started making lunch, "DON'T MAKE DINNER!" Poor Ed. "I was just making lunch!" Kana- "Well... I guess that's okay.").

So I found a great lasagna recipe; it's unlike any other lasagna I've tried before. And it was delicious.


Chili-Cheese Lasagna

  • 1 lb. ground beef
  • 2 cloves garlic, minced
  • 1 jar (24 oz.) spaghetti sauce)
  • 1/4 c. water
  • 1 can (15 oz.) black beans, rinsed
  • 1 green pepper, finely chopped
  • 3/4 c. salsa
  • 1 Tbsp. chili powder
  • 9 lasagna noodles, cooked
  • 1-1/2 c. cottage cheese
  • 1-1/2 cup Mexican style shredded cheese 


Preheat the oven to 375°F. Brown beef and garlic in a large skillet. Add next 6 ingredients; stir. Simmer 5 minutes, stirring occasionally.

Grease a 13x9-inch baking pan, then spread 2 cups of the meat sauce on the bottom of the pan. Cover with layers of 3 noodles, 1/2 cup of cottage cheese, 1/2 cup of shredded cheese, and 2 cups of the remaining meat sauce. Repeat these layers twice, and then top with the remaining shredded cheese. Cover the dish with aluminum foil and bake for 1 hour- after an hour, remove the foil and bake for an additional 10 minutes. Let the lasagna stand for 10 minutes before cutting to serve.


Thanks to kraftrecipes.com for the great recipe!

Monday, March 11, 2013

Venison: A Trial of Lots and Lots of Deer Meat

When Jeremy and I went to visit my family for Christmas, Bridian gave us what seemed like a thousand pounds of "meat"- most of it was definitely homemade packaging, some of it said "sausage", some had little boxes on it that a hunter marks (and each had different marks, don't worry), but Bridian explained it was all deer meat, just stored in different ways. She lives in Texas and works with hunters. Go figure.

The conversation preceding us possessing 10 (okay, not a thousand) pounds of venison went something like this:

"Hey, do you guys want some deer meat?"

"...uh. What?"

"Deer meat."

"I heard you."

"It cooks just like ground beef. Except for the sausage. We had that for lunch today."

(I remembered lunch, that it was good and then wondered if I really wanted to remember it being good anymore. I really was very, very hesitant to this deer idea.)

Jeremy said, "Sure!" remembering how much he had loved lunch, and we put it in the back of our car. It was December, so it stayed in the trunk very well preserved until we got home. And I had to figure out what to do with that.

So this is part 1 of what I did with the deer meat. And I have to say, especially to anyone else who is hesitant about venison and not wanting to continue reading this, it's pretty tasty. Good things ahead, I promise. And if you want to just use ground beef, most of the recipes are intended for ground beef. Either is good.

[Just an insert- we finished the deer a while ago, I just haven't posted in a very long time. I don't know if deer really will keep forever or not. So we just... used it.]


Quesadilla Casserole


  • 1 lb. ground venison
  • 1/2 cup chopped onion
  • 2- 8oz. cans tomato sauce
  • 1 can (15 oz) black beans, drained and rinsed
  • 1 can (4.5 oz.) chopped green chiles, undrained
  • 1 can (8.75 oz) whole kernel corn, undrained
  • 6 flour tortillas (8-inch)
  • 2 cups shredded cheddar cheese
  • 2 tsp chili powder
  • 1 tsp ground cumin
  • 1 tsp minced garlic
  • 1/2 tsp oregano leaves
  • 1/2 tsp crushed red pepper
  1. Brown venison and onion in a large skillet on medium-high heat; drain. [Draining is especially important. Deer fat's gross]
  2. Add tomato sauce, beans, corn, and green chiles; mix well.
  3. Stir in all of the spices except red pepper. Bring to a boil. 
  4. Reduce to low heat and simmer 5 minutes. Add red pepper to taste.
  5. Spread 1/2 cup of the venison mixture on the bottom of a 13x9 baking dish sprayed with no-stick cooking spray. Top with 3 of the tortillas, overlapping as needed. Layer with 1/2 of the remaining beef mixture and 1/2 of the cheese. Repeat with remaining tortillas, venison mixture, and cheese.
  6. Bake at 350 for 15 minutes or until heated through. Let stand about 5 minutes before serving.


So good :)

Friday, January 25, 2013

Cordon Bleu: How To Host On Your Living Room Floor

Jeremy and I love Scott Christofferson. Really. He's one of our favorite people. We invited him over for dinner Wednesday night because we just wanted an excuse to see him. So hey, why not offer food?

(Let's be honest. He wanted to come over anyway. We threw in food when we already knew he was coming.)

But then Jeremy had an accident snowboarding when he tried to flip off the roof  did something to cause a muscle spasm in his back, and Tuesday night/Wednesday morning learned that he couldn't walk. Or get out of bed. Or even sit up. 

I called Scotty. Jeremy had made it to our bedroom floor and had spent the morning trying to rotate between his back and stomach, depending on which hurt less, so I told Scotty that unless he wanted to picnic on our floor, maybe we'd better not do dinner. He was a little bit distraught and asked if we could reschedule. Immediately. I said, "Of course! Scotty, we really don't mind picnicking on our floor. If you're okay with it, come over." It was more than a little tongue-in-cheek. Not that we really would've been opposed, but... When I invite someone over to dinner, I guess my expectation was to serve them good food at a table with pleasant conversation, just an overall good time. 

My expectation changed. Scotty said, "That sounds great. See you at 5:30."

I laughed after I hung up the phone. Why was I even surprised? I texted Jeremy (knowing his phone was within arm's reach) "Scotty wants to have a picnic on our floor :)" to which he responded, "Sweet."

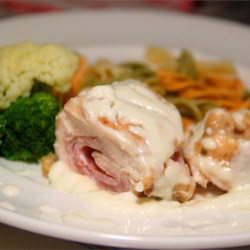
So I went to my classes, and maybe during one of them, I found what looked like a relatively simple recipe for cordon bleu, which is one of Jeremy's favorite dishes. This has previously been a little intimidating because I'd always thought cordon bleu was complicated to make. Turns out, it really isn't too bad, I just needed a couple of things. Swiss cheese slices, for example.  I ran to the grocery story when we got out of class early, running around just a little bit because I remembered Jeremy dragging himself across the floor to get to the bathroom earlier that morning and was more than a little worried about leaving him alone for the duration of my classes that afternoon. 

When I got home, Jeremy had managed to stay comfortably propped up on some pillows against the foot of the bed and had been pretty content to get some work done on his laptop. As I started pulling things out to start dinner, he said that he wanted to at least come sit in by where I was. Thanks to my grandparents, we have a lazy boy that meant Jeremy could sit and talk to me while I made dinner. 

Which I imagine was a little entertaining. But I promise, this recipe is easy.

Ingredients:
  • 6 skinless, boneless chicken breast halves, thawed
  • 6 slices Swiss cheese
  • 6 slices ham
  • 3 tablespoons flour
  • 1 teaspoon paprika
  • 6 tablespoons of butter
  • 1/4 apple cider vinegar
  • 1/4 cup water
  • 1 teaspoon chicken bouillon granules (or a small chicken bouillon cube)
  • 1 tablespoon cornstarch
  • 1 cup heavy whipping cream


1. Pound the chicken breasts if they are too thick. Place a cheese and ham slice on each breast within 1/2 inch of the edges. fold the edges of the chicken over the filling, and secure with toothpicks.

I used an actual hammer, and this is what started my disbelief that this was going to turn out anything like cordon bleu I've had in the past. My chicken was still a little bit frozen, so sometimes when I hit the first piece of chicken, I made holes in it. Which I said out loud. Jeremy's disbelief started then too. "Um, yeah. Don't do that."

So I figured out how to not make holes in the chicken, and managed to wrap all of my chicken pieces with ham and cheese inside. I still was not convinced it was right and was sure I was just making a mess. I said to Jeremy, "Let's just not call this cordon bleu, okay? We'll just give it a new name." 
"A rose by any other name..." 
"Smells just as sweet? I'm not really worried it's not going to taste good, it just doesn't look like your conventional cordon bleu."
"Right, so it's fine if you rename it."

I rolled the last one and gave a pathetic laugh that turned into a whine as I set it on the plate to be cooked. Jeremy said, "That bad, huh?" I shouldn't have told him it was cordon bleu either.

2. Mix the flour and the paprika, and coat the chicken pieces.

Simple enough. I just thought it made my already ugly wraps look even uglier.

But then, the redeeming step.
3. Heat the butter in a large skillet over medium-high heat, and cook the chicken until browned on all sides.

Cooking it is what did it. Yes, there are definitely prettier ways to wrap chicken, cheese, and ham, but if you are concerned you aren't doing a good enough job, don't worry. Cooking the chicken changes your outlook on everything. It looks like cordon bleu, and you realize you haven't ruined a good name.

Well, I was relieved anyway.

4. Add the apple cider vinegar, water, and bouillon. Reduce heat to low, cover, and simmer for 30 minutes, until chicken is no longer pink and juices run clear.

This starts to smell fantastic. Jeremy's disbelief disappeared when he smelled it. I was boiling potatoes at the same time (this is great with mashed potatoes) and something was burning on the burner, and that's all I could smell. "Oh no," I said, "what's burning..." sure that I, again, had actually ruined everything. "I don't know what you're smelling, but that chicken smells fantastic." I pulled off the lid and it overpowered the little piece of whatever stuck on the burner. 

5. Remove the toothpicks and transfer the chicken to a warm platter. Blend the cornstarch and cream in a small bowl, and whisk slowly into the same skillet with the remaining vinegar and spices. Cook, stirring until thickened, and pour over the chicken. Serve warm.

My only advice here is to be careful with the toothpicks. They've just been partially cooked into the chicken, so they're a little stubborn and incredibly hot. 


We laid out a blanket in our front room, used stemware and cloth napkins, and served pomegranate 7up. And Jeremy spent the meal alternating between sitting up and laying on his side. All in all, a success. As far as muscle spasmed backs and picnics on the floor go :)


Just an update: Jeremy is doing much better. He can walk, get up and down, lift things, and perform most normal life tasks without any assistance. But it made for an adventurous and creative couple of days!